Downloading studies from the study list
Proceed as follows to download a study from the study list:
1. Select the studies you wish to download.
2. Click on Download images.
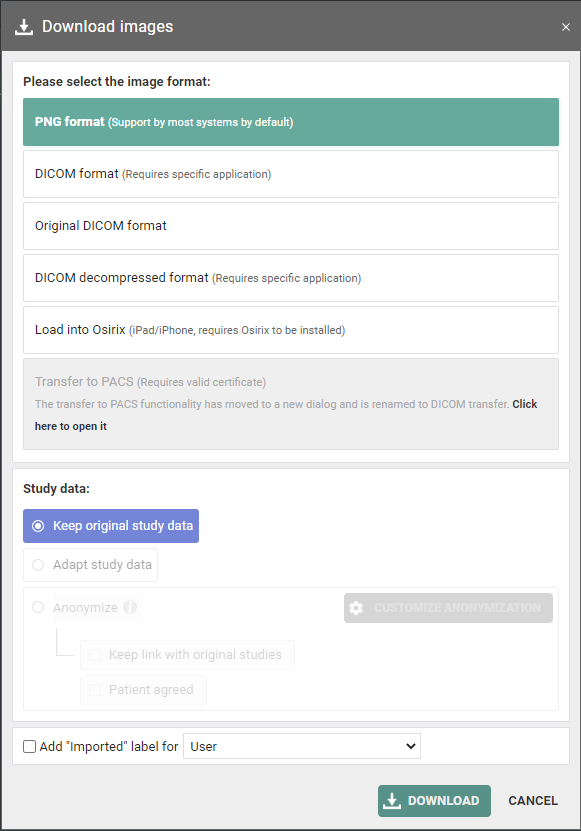
3. A pop-up window will appear offering you various options for downloading the images:
◦ Download a ZIP file with images in PNG format (standard image format)
◦ Download a ZIP file with images in DICOM format (medical standard)
◦ Download a ZIP file with images in original DICOM format with DICOM tags as provided by the local modality or PACS, not taking into account modifications by RIS data or made in DeepUnity PACSonWEB
◦ Download a ZIP file with images in uncompressed DICOM format
◦ Load the images directly in Osirix
|
Note |
|

|
You can only use this option if OsiriX has been installed.
In order to be able to load exams into OsiriX, it is mandatory that pop ups from the DeepUnity PACSonWEB website are allowed by your browser.
|
◦ Transfer the images to PACS
This option has been moved to a separate DICOM Transfer dialog. See Importing studies in PACS
4. Click on the format you wish to download and then click on DOWNLOAD.
For the following options, the report is included as a SR file (structured report) by default:
◦ DICOM format
◦ DICOM decompressed format
Note | |
| The include report option is not available if: • There is no report. • The report is still a draft and doesn't have the status preliminary or validated. • The report is in PDF format. • You don't have access to the report. |
For the same options, it is possible to include an offline viewer, which will allow you to view the images outside of DeepUnity PACSonWEB.
Note | |
| The availability of the offline viewer depends on your environment, because of region-specific viewer licenses. |
Study data
If you download a single exam and select DICOM, DICOM uncompressed or Load into Osirix, you have the option to modify or anonymize the study data.
A full explanation on data anonymization is available in Anonymizing studies.
Label
You can add the Imported label to the study for
◦ your user
◦ a user group
This label is visible on the study list in the column Labels.
How to configure your column settings is explained in Configuring the study list
5. If you download a single exam and select DICOM or DICOM uncompressed, you also have the option of editing the study data.
Select Adapt study data and then click on Next step. This option is always selected for Load in OsiriX.
For the other options, the data can only be edited manually.
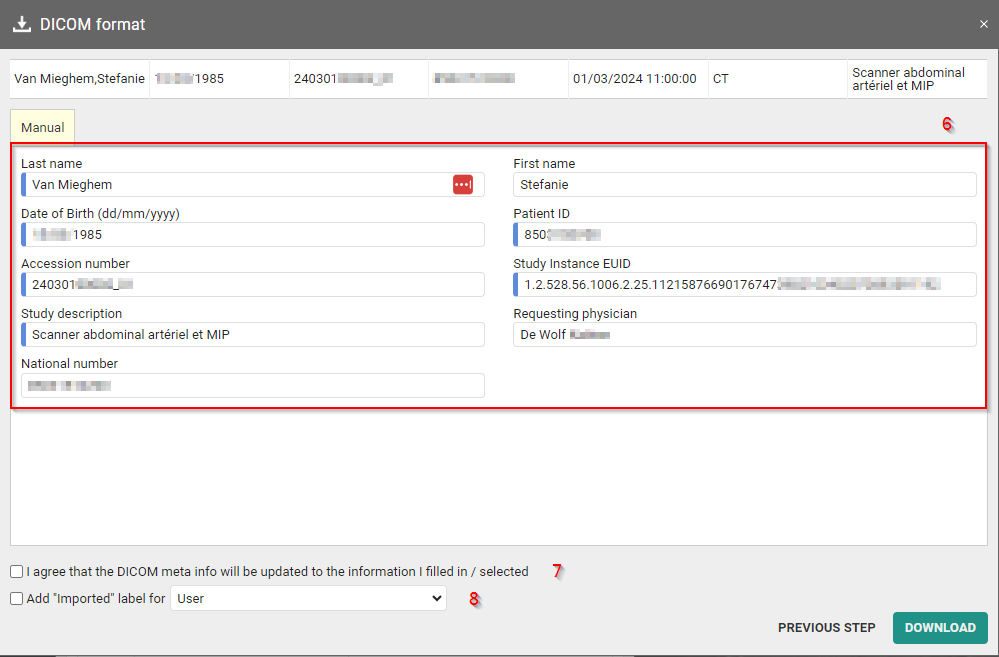
6. Here you can edit the study data and patient information.
7. You must always check the box next to I agree to the DICOM meta info being updated with the entered/selected information before you may proceed.
8. If you wish to add the imported label to this study, check the box next to Add the "Imported" label for.
Note | |
| You can configure this for your user and for the groups to which you belong. |
9. A ZIP file will be displayed.
Note | |
| Where the ZIP file appears depends on your browser. In Google Chrome, for example, it will be displayed in the lower left part of the screen. |
10. Double-click on the ZIP file. A window will be displayed with a tab called Extract: Compressed Folder Tools.
11. You can now see various directories. Each directory corresponds to a study whose images you wish to download.
12. Click on Extract all to extract the ZIP files and save them on your computer.