Upload Portal
The Upload Portal allows you to upload your medical images to your Hospital / Institution.

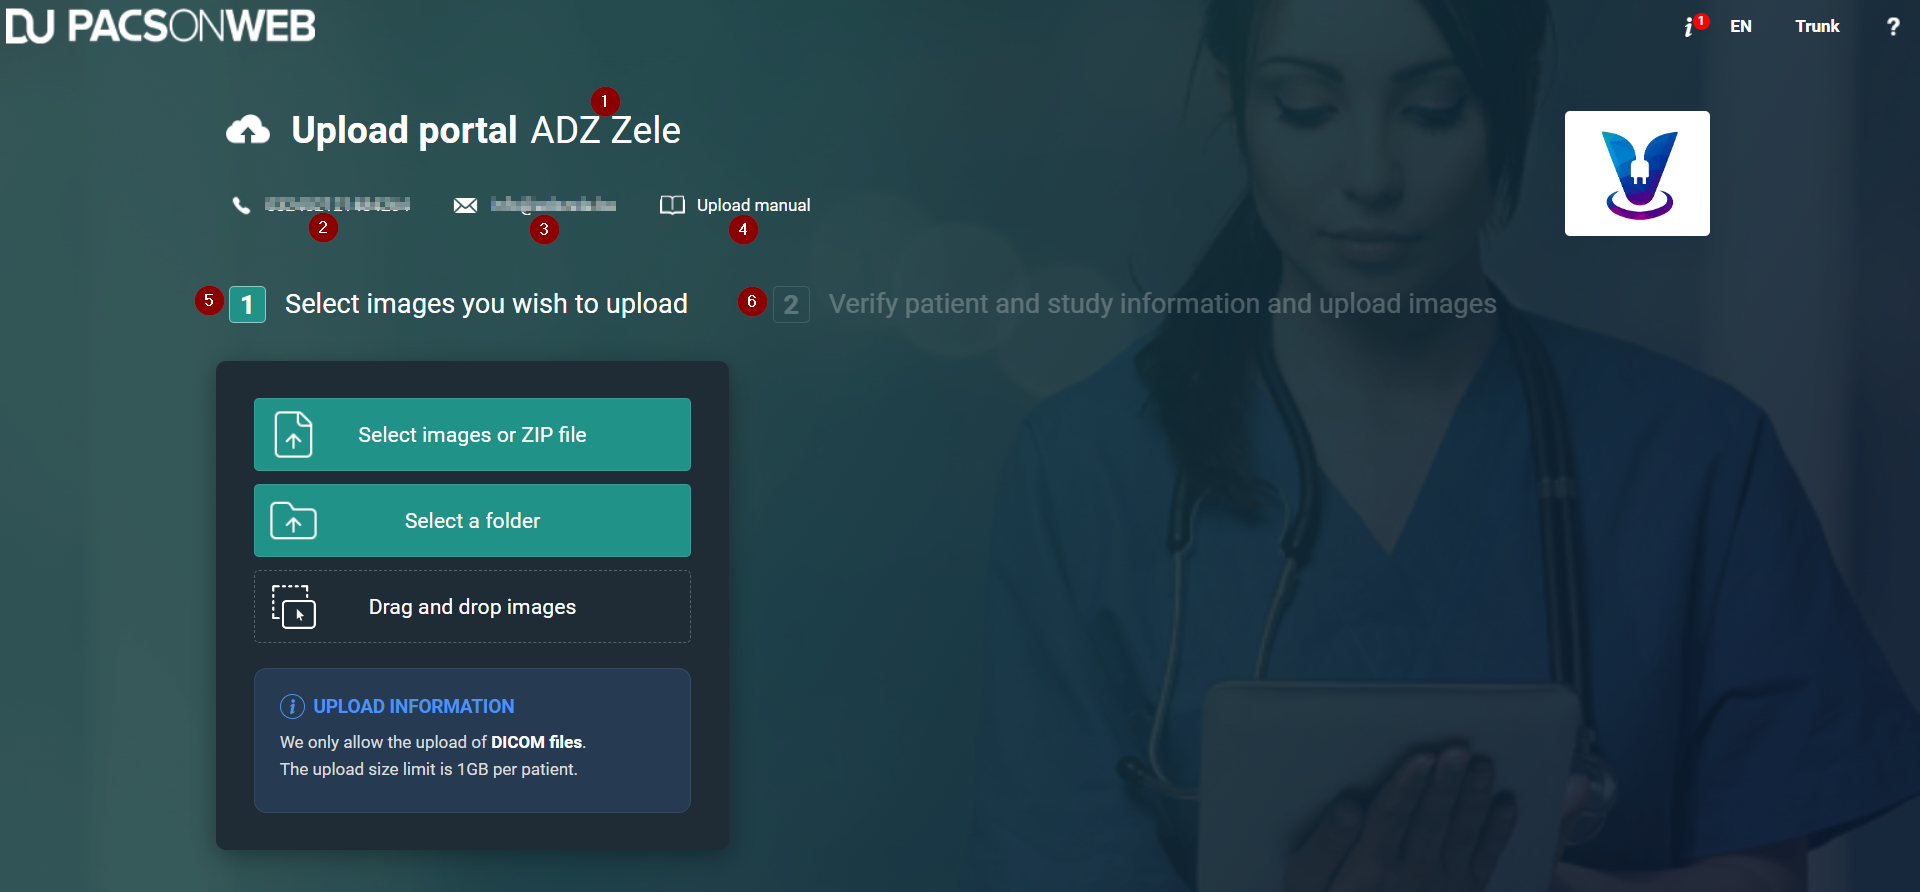
Overview of the Upload Portal page

1. Source: the Hospital/Institution from which you received the Upload code
2. Phone number from your Hospital/Institution
3. E-mail address from your Hospital/Institution
4. Hyperlink to the Upload manual
5. Panel 1 – Select images you wish to upload (highlighted by default)
6. Panel 2 – Verify patient and study information and upload images
Note Label

Note:

Panel 2 will only become available once you have added images to the Upload Portal

Select images you wish to upload

There are 3 different options to add your medical images to the Upload Portal.
Follow the steps below to successfully upload your medical images to the Hospital / Institution:

Add multiple images using the button Select images or ZIP file

1. Click on the button Select images or ZIP file.
2. In the pop-up dialog, navigate to the folder, where your images are located.
3. In the folder select all files.
tip Label

Tip:

You can select all files by selecting one file and pressing Ctrl + A or by selecting the first file in the folder, scrolling down to the end of the files, pressing SHIFT + left mouse, and clicking on the last file.
4. Click on the 'Open' button in the pop-up dialog.
Your images will now be added to the upload portal

Add a ZIP file using the button Select images or ZIP file

1. Click on the button Select images or ZIP file.
2. In the pop-up dialog, navigate to the ZIP file that contains your images.
3. Select the ZIP file.
4. Click on the 'Open' button in the pop-up dialog.
Your images will now be added to the upload portal

Select a folder or Select a CD/DVD using the button Select a folder

1. Click on the button Select a folder.
2. In the pop-up dialog, navigate to the folder or CD/DVD drive, where your images are located.
3. Select the folder that contains your images
4. Click on the 'Upload' button in the pop-up dialog.
Your images will now be added to the upload portal
tip Label

Tip:

Sometimes your browser can give you an additional pop-up message when you select a folder, just click on 'Upload' again.

Drag and drop images using the Drag and drop images option

Note Label

Note:

This is not a button, to use this option, simply drag and drop the selected files to the Drag and drop images option.
1. Open your file explorer.
2. Navigate to the folder, where your images are located, and open the content of the folder
3. In the folder select all files (see TIP)
4. With all the files selected (highlighted), hold down the left mouse button and drag the images onto this option in the Upload portal.
Your images will now be added to the upload portal

Verify patient and study information and upload images

Verify that you added the correct images to the Upload Portal
1. Check the patient information:
a. Verify that you added the correct patient to the Upload portal.
b. Optionally, you can enter your personal e-mail address or mobile phone number.
tip Label

Tip:

This can be used as a reference or if the hospital needs to contact you.
2. Check the study information:
a. Verify that you added the correct study to the Upload portal.
3. Agree with the privacy policy & consent to share your medical images with the hospital.
4. Click on the START UPLOAD button.
important Label

Important!

Do not close your browser during upload.
Result: The upload has started.
Note Label

Note:

Accession numbers and Patient IDs will be anonymised during upload. This is to avoid mismatches in PACSonWEB

File upload status

Uploading: upload is in progress
PAUSE UPLOAD: You have the option to pause the upload.
CANCEL UPLOAD: You have the option to cancel the upload.
Validating files: scanning for malware. We perform a malware scan of the images, to ensure that no viruses have been uploaded that could infect the hospital/institution.
Upload successful: Upload is complete. All files have been successfully uploaded to the Hospital / Institution.
Once the message 'Upload successful' appears in the panel, you can safely close the browser or start a new upload.

As a PACSonWEB Source User / Source Admin

Once uploaded successfully, the studies can be found via the Worklist or the Study list. All uploaded studies will have the label 'Uploaded'.
Accession numbers and Patient IDs
restriction Label

Restriction:

You cannot search for a study by Accession Number or Patient ID as these fields have been anonymised during upload.
Accession Numbers and Patient IDs are not generated by PACSonWEB, but by hospitals. As the Upload Portal receives studies from different hospitals and regions, we cannot guarantee that an Accession Number or Patient ID is a unique number and therefore they cannot be used to automatically link a study to a patient. To avoid anomalies and mismatched studies, all studies uploaded to the Upload Portal are anonymised.
This process should trigger the Source admin to link the studies to the correct patient via Patient merge to make them available as prior studies.
Filtering Studies
Filtering the list using the following search criteria: 'Contains Label' = 'Uploaded', will allow you to see all studies that have been uploaded via the Upload portal.
The workflow status of uploaded studies is automatically set to 'Finalized' to avoid cluttering the radiologists' reading worklist.
When the study is opened in the viewer, an icon and accompanying message will be displayed indicating that the studies have been uploaded via the Upload portal.
By a user (no upload code needed)
The same information is available in the Study information panel of the study:
 
By a patient/ referring physician (via upload code)
The same information is available in the Study information panel of the study:

Verifying the content of the Uploaded study

As a PACSonWEB Source Admin, you can change the label linked to an uploaded study.
You can remove the label 'Uploaded'. You can link the new label 'Uploaded-Reviewed' (available by default in the system).
Additionally, all the same options are available as for other studies within PACSonWEB, e.g. merging with an existing patient, DICOM transfer of the study to an other PACS system.