Worklist configuration
Predefined worklists
For every source or the group of sources (for Cross-Source Worklists) there are 4 predefined worklists:
• All for source: This worklist contains all studies for the source (or group).
• All my reviews: This worklist contains all studies on status Pending second validation where the Validating user is the current logged in user.
• All my unread: This worklist contains all unread studies for which the logged in user is marked as "Reading user".
• All unread: This worklist contains all unread studies for this source (or group).
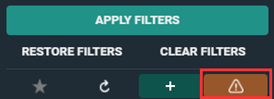
Predefined worklists cannot be deleted or customized. If changes are made to a predefined worklist, an orange triangle icon wil appear at the bottom of the page to indicate that changes have been made to the default of the worklist.
Saving as a new worklist
To save changes made to a predefined worklist from the drop-down menu in the filters panel.
1. Select one of the predefined worklists and add extra filters to create the desired worklist.
2. Enter criteria into the filters field according to the changes you want to configure in the new worklist.
a. For example, set a specific modality.
3. Click the plus icon  to save as new worklist.
to save as new worklist.4. In the Create new worklist dialog, provide the following information:
a. Name: The name of your worklist.
b. Description: Description for the worklist.
c. Group: Saves the worklist on a user or group level.
5. Click SAVE.
The new worklist is saved in the worklist drop-down, along with the predefined worklists.
You can make changes to the saved worklist by updating the filter fields according to your desired changes and clicking  Save worklist.
Save worklist.Important | |
 | To save the worklist for a group, the user must be a group admin. |
Filtering and sorting studies in the worklist
Filters make it easier to find an order in your worklist. To improve your search results, enter the desired criteria into the filter fields.
• Study date can be used as a relative date/time period.
◦ This means, for example, when selecting Last 7 days, this will be automatically updated the next day.
• By default, the orders in the worklist are sorted first by priority and second by study date (oldest to newest).
◦ To use sorting filters, click the description of the column.
◦ To use more than one sorting hold the SHIFT key and select the desired column. The numbers will display the sorting ranking.

Customization of columns and filters
The predefined worklists have a default set of columns and filters. Column and filter settings can be configured according to personal preferences.
To change the settings:
1. Click on the  column settings or
  filter settings icon.
column settings or filter settings icon.2. Select or deselect the fields you want to display or hide.
Note | |
 | Columns and filters are displayed in the worklist in the order in which they appear in the settings list. To change the order in which they appear in the worklist, select a field and drag it to a new position in the settings list. |
3. Click APPLY.
The fields available in the filter and column settings are listed in the table below.
| Filter settings fields | Column settings fields |
|---|---|
• Accession number • Anomalies • Contains labels • Contains procedures • Contains procedure code • Date of birth • Examination room • Exclude procedures • Exclude procedure code • Excluded labels • External Procedure ID • First name • First Name at Birth • Last modified • Last name • Last Name at Birth • Modality • National number • Number of images higher than • Order Number • Patient ID • Performing department • Place of birth • Priority • Reading user • Report edited • Report edited by • Requesting department • Requesting physician • Site • Status • Study date • Validating user • AI Status • Findings • Speciality • Report status | • Order Number • Patient ◦ Date of birth ◦ First name ◦ First Name at Birth ◦ Last name ◦ Last Name at Birth ◦ National Number ◦ Patient ID ◦ Place of birth • Performing department • Requesting department • Requesting Physician • Site • Select • Studies ◦ Accession number ◦ Examination room ◦ External Procedure ID ◦ Extra ◦ Images ◦ Labels ◦ Last modified ◦ Priority ◦ Procedures ◦ Reading user ◦ Report ◦ Status ◦ Study date ◦ Validating user ◦ AI Status ◦ Findings ◦ Source ◦ Speciality ◦ SLA Deadline |
The icon, displayed in the Report column, differs according to the report status:
•  Auto saved report
Auto saved report•  Draft report
Draft report•  Preliminary report
Preliminary report•  Validated report
Validated report•  Validated addendum report
Validated addendum reportThe Extra column can contain icons for the following statuses:
•  Anomalies
Anomalies•  Messages (read)
Messages (read)•  Messages (unread)
Messages (unread)•  Filtered study
Filtered study•  Canceled study
Canceled study•  Locked
Locked•  Reserved
ReservedNote | |
| A worklist can also be configured based on the filter Anomalies. However, the Anomalies filter is only accessible for source admins. |
Deleting a worklist

To delete a worklist:
1. Click on the  icon.
icon.
icon.2. In the dialog, click DELETE.
Important | |
| Deleting a worklist cannot be undone. |
Default worklist
To make a worklist your default worklist, click on the  star icon.
star icon.When opening DU POW, the worklist marked as default will be opened.
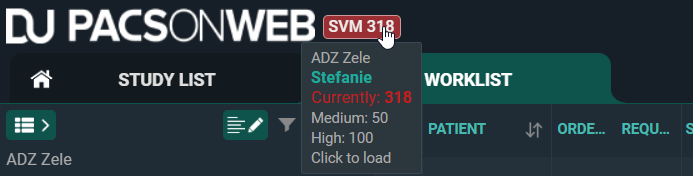
Dashboard
The Dashboard contains shortcuts of your personal selection of worklists. The purpose of these shortcuts is to have an overview of the counts in the worklist without the need to open the worklist.
The count refreshes automatically.
Adding a worklist to your dashboard
To add a worklist to your dashboard:
1. Select the worklist you want to add to your dashboard.
2. Click on the  dashboard icon.
dashboard icon.3. In the following dialog:
a. Enter an abbreviation for the shortcut (limited to 3 characters).
a. Enter the medium and high threshold. These numbers will determine in which color the shortcut icon will be shown: grey, orange or red.
b. Click Add worklist to dashboard.
The shortcut icon will be displayed in the dashboard next to the DeepUnity PACSonWEB logo.
Clicking on this icon will open the worklist.
Editing/removing a shortcut from the dashboard
You can edit or remove a worklist from your dashboard by opening the related worklist, either by selecting it from your list of worklists or by clicking the related icon in the dashboard.
To open the configuration window:
1. Click on the dashboard icon .
.2. From this window you have three options:
◦ Click CANCEL to cancel and close the dialog again.
◦ Edit and click SAVE to save the changes to your settings.
◦ Click REMOVE to remove the shortcut from the dashboard.
Overview Worklists

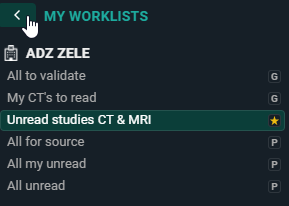
You can see an overview of all worklists available to you by clicking the My Worklists icon  at the top left of the filters panel.
at the top left of the filters panel.• Predefined worklists are indicated with a 'P'.
• Worklists with a 'G' are available to a group you belong to.
• The default worklist is indicated with a yellow star icon.